Detail Your Car Like a Professional
Car detailing can be an arduous task, and sometimes if you use the wrong material or techniques you can create more harm than good. Here are some professional tips to make your car stand out or simply maintain your car’s outer protective coating:
Products
There are a lot of refinish products in the marketplace and with advances in technology there are always new and innovative products arriving to make the job easier. Consider the use of items such as:
EXTERIOR
- Paint-cleaning Clay Bars
- Car Wash Solution
- Camosis
- Microfibre Cloths
- Pre-wax Cleaners
- Polishing Compounds
- Automotive Wax (Liquid & hand application)
- Soft Brisle Brush (for tyres and rims)
INTERIOR
- Hard Brush
- Interior Cleaners
- Cheap Air Compressor (optional)
- Vacuum
Step 1: Wash (Hand Wash Recommended)
TYRES AND RIMS
Tyres and rims should be cleaned BEFORE you clean and protect your vehicle’s paintwork. Avoid the use of detergents and acid-based cleaning products. Use car wash and a strong stream of water (pressure washers are okay) to dislodge dirt and brake dust buildup.
Pro Tips
- A soft-bristle brush may also help for stubborn grime.
- Allow the cleaning agent to do its job by letting it soak in for around 30 seconds, then rinse off.
- Do not let the cleaning agent dry on the rim unless the product specifies otherwise.
- Finish by applying an even layer of tyre shine (non-silicone based is best).
PAINT WORK
Hand washing is recommended, it’s a great way to familiarise yourself with your vehicles surface and more importantly avoid those, what i call, “spider-web scratches” you get when you go through the automatic car washes.
Pro Tips
- Ensure your vehicle is parked in the shade and is not hot to touch. This will help avoid the soapy water evaporating before you get the chance to rinse it and leaving unsightly spots and blemishes.
- Avoid detergents as they will strip the surface of protective wax coatings, exposing the vehicle to scratches and stains. Instead, use Car Wash solution – it will help preserve your vehicle’s finish
- Ensure the sponge is free of dirt prior to applying it each time to the painted surface.
- NEVER EVER use abrasive sponges to remove hard fallout such as bird/bat poo, tar, gum or any hard to remove material as this will most certainly scratch the paint.
- Dry the surface using a chamois, soaked with water and wrung dry.
- Open and slam doors to ensure excess water that may be trapped in mouldings to run out.
GLASS
Clean your glass last as it will have grime and dirt from the other cleaning steps.
Pro Tips
- Buff the glass using a micro-fibre cloth. This does a great job of getting rid of residue which causes streaks and spots.
- Remember to wind down the side windows to get to the top edges.
You may want to stop at giving your vehicle a good wash. However it is a good idea once and awhile to give your paint work some extra TLC, especially if you want to sell the car or want to make it presentable. So steps 2 to 4 are optional.
Step 2: Clay Bar your Paint Work
Use of a paint-cleaning clay block lubricated with soapy water is a great way of removing pollution and fallout that settles on the surface of your paint work.
For a more detailed how to guide there are some great how to links on the web. Here’s one i recommend: How to Clay Bar
Pro Tips
- It is essential to ensure the block is clean and free of any foreign objects so keep in a enclosed container.
- Be careful not to drop the clay bar on the floor as there is a good chance it will pick up some contaminants which may cause scratches.
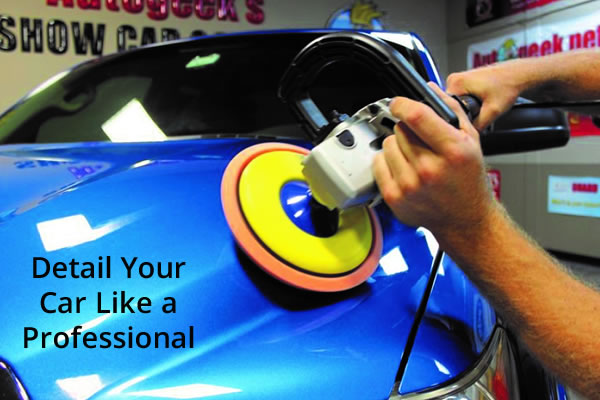
Step 3: Cut and Polish your Paint Work
Polishing with a liquid compound can be done by hand or machine, however, if you have not been properly trained in the use of machine polishers, you may be better off doing by hand. Rotating polishing machines in particular will damage paintwork if used incorrectly. Oscilating buffers are more forgiving, and much easier to use.
Polishing removes wax and cleans the top layer by removing unwanted chemicals that have bonded to the paint’s surface. They can also remove swirl marks and small scratches. Polishing is designed to smooth the surface of the paint, which will make it shine. Some polishes contain wax, but wax itself does not smooth the paint.
Step 4: Apply Wax
Your vehicle had a new clear coat when it left the factory, however, over time that coating wears off leaving the paint unprotected against the elements. Wax replaces that protection. Wax is sacrificial and will also wear off over the course of a few months, but in that time it will absorb stains and small scratches before those hazards reach the paintwork itself.
Pro Tips
- Use a liquid spray wax between washes – it’s a good way to touch up scratches and stains, however it is no substitute for a hand application wax coating.
- Schedule your cleaning and waxing regime according to your vehicle’s exposure to the elements to maintain its showroom condition.
- There area lot of waxes and polishes on the market and it all comes down to personal preferences. We tend to like the Maguires range however try a few brands out and see which suites best.
Interior
Pro Tips
- Use Compressed Air. It’s useful for a multitude of tasks especially blow dirt and debris from the nooks and crannies. You do not need to purchase heavy workshop equipment to get compressed air. There are many inexpensive small air compressors available at your local hardware store.
- Use hard brushes for carpets and floors to dislodge any hard to remove material.